I’m very happy that you are here. To me this means that you are about to face a great challenge. Instead of watching TV and snacking all day long on your weekend, you are probably making the most important decision in your life: to go outside, to get some fresh air, to find out how beautiful the great outdoors can be. Who knows, maybe you will meet the most important person in your life, or open for yourself another kind of business?
Who am I? I am a guy who now for twenty-some years breathes, sleeps, and talks skiing, driving friends, acquaintances, and now even strangers nuts with my unyielding enthusiasm. Anyone who comes in contact with me eventually breaks down and finds himself (or herself) on the slope, and, to my great pride and joy, comes back many times after. I started out when there was no high-tech stuff, when all you had were two straight and flat pieces of wood. I started out teaching myself, learning to make it down the slope in one piece by watching others. And here I am now, years later, a certified ski instructor who believes that anyone, I repeat, anyone can and should fall in love with skiing. I consider it my mission to introduce beginners to the wonderful world of skiing, to help those who know their way around the slopes to improve, and provide useful information for everyone regardless of their level of advancement. This is why I created this site, and I hope it serves its purpose.
Your First Step
So you have made your way to a ski resort. The best thing for you to do is to go to the ski school and to sign up for a lesson. However, at some resorts it can be very expensive. There are two other ways to learn: to follow instructions on this site or to find among your friends an experienced skier who can help you out with your first steps. Why am I not pushing this site? First of all because it’s better to watch than to hear. Second of all, you can’t watch yourself. It is best when someone experienced can give you feedback, but in case such a person is not available, you should follow instructions on this page because I paid special attention to what each body movement should feel like when performed properly.
Equipment
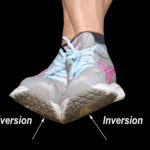
Since we are assuming that you are a novice, with no equipment of your own, venture into the rental department. Do not worry too much about skis. There is only one thing that you should remember: they have to be shaped or parabolic. Now to your boots. They are probably the most important part of skiing equipment. I will try to explain why. First of all, your boots must be comfortable. This means that when you put them on and walk around inside for 5-10 minutes, there are no uncomfortable pressure points anywhere, boots feel snug and, most importantly, you should not be able to lift up your hill from the inside sole of the boot while bending your knee and pushing your shins against the tongues of the boots. Let me explain the importance of a comfortable boot. Your boot is what connects you to your skis. Every movements that you make with your ankle will have an immediate impact on the movement of your skis. If you have a lot of room in your boot, your skis will not correctly respond to your motion. Think about that and try to find the best size for yourself (normally it will be the same as your shoe size).
Now you are ready to start you first ski lesson, but first, try walking in your boots. This is quite different from walking in regular shoes. Normally you put your whole foot on the ground when you take a step. In ski boots, you put the heel down first and your foot moves from heel to toe because plastic skiing boot is not flexible like your regular shoes. So think about moving your foot from heel to toe. Second, learn to carry your skis. There are three different ways: over the shoulder in open spaces, vertically in your hands in crowded areas, and, if you are not strong enough, you may cradle them under the arm.
Balance
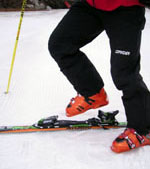
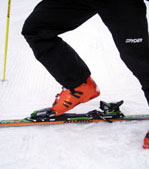
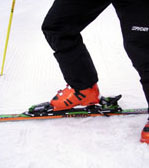
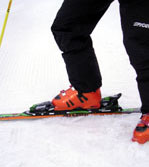
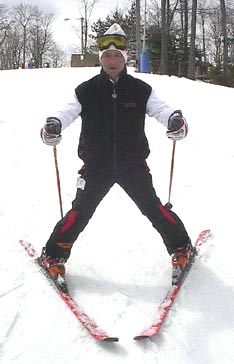
Now, before you put your skis on, let’s talk a little bit about your balance, or about your stance, because this is the most important thing in skiing. Please refer to the pictures as you go along, they should give you visual support of what I am talking about. To find your correct stance (“fore-aft” stance), stand in your boots so that the pressure from the tongue of the boot feels equally distributed from shin to calf.
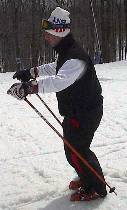
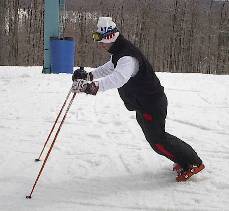
Most of your weight should be felt between the heel and the arch of the foot. You should feel less weight on your toes. From this position you can move in any direction quickly and smoothly. Now start leaning forward in your boots until all your weight is on your toes. Keep pressing forward until you pitch forward (use your poles to catch yourself).
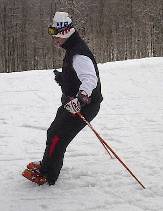
Now, go back to a neutral stance and then try to flex forward just enough to feel the pressure shift from the center of the foot to the ball of the foot but without falling forward. This forward position is within the range of the normal fore- aft movements of the correct stance. Do the same to the back and feel the pressure of your boot build against the calf and under your heel. Keep doing that until you pitch backward (again, use your poles to catch yourself)
Go back to the neutral and lean back just enough that you feel the pressure shift from your center of you foot to the heel. This is the backward extreme in your fore-aft movement range. Try to do exactly the same with your skis on. This exercise allows you to feel how the weight is distributed in the boot and where the balance points are.
First Feel of Skis
Now it is finally the time to put your skis on.
Binding consists of two parts: the tip part and the heel part. So, when you put your boots in your bindings for the first time, keep in mind that the tips go in first.
Now with your skis on, let’s try to do some exercises to become familiar with ski equipment
1. Lift one foot and then the other
2. Lift the heel up, toe up, whole foot up
3. Lift the whole foot and turn the ski to the right and then to the left
All these exercises you should do on a flat terrain. Try to find a spot with little or no traffic.
“Walking” in Your Skis
Now it is time to walk on your skis. Try not to lift a ski to take a step, but try to slide on it.
Instead of making steps just slide forward on the inner edge of your skis. In this exercise your hands will be good helpers for your balance because when you are sliding on your right leg your right hand is moving forward and making a pole touch; after that, your left leg will ski forward and at the same time your left hand will point forward with a pole touch. Try to do this exercise in the straight line first, then make circles on the right and on the left side, and after that a figure eight.
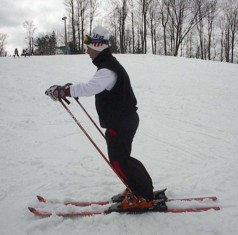
I think that by this time you should be feeling much more comfortable than you did just about half an hour ago. Now, you will learn one great exercise that you will use throughout your skiing life. But before we do that, let’s put you in the right position, or stance. This is your stance: feet shoulder width apart, the distance between your feet is 10-12 inches, your knees are bent, you feel pressure on the tongues of your boots and your hands are extended forward with elbows slightly bent .It is very important to feel pressure on the tongues of your boots, in your shins. When you are skiing, you always have to feel pressure on your shins from the tongue of your boots.
The Wedge
This is the most important part of your stance. Now, from this position, you can try to put your skis in the wedge; that means that the tips of your skis become closer to each other than tails. You can do it in three different ways: step into wedge, hop into wedge, or slide into wedge. The most important is the last one, slide into wedge. Try to practice it for a while. This is a movement you have to use when you slow down or stop. Try to remember it.
Climbing the Hill
Next thing that you will do is climb the hill. How is this done? First, standing at the bottom of the hill, try to put your skis sideways or in other words, across the hill. Now what do you do? Try to take a sidestep with your uphill ski (uphill ski, or inside ski, is the ski closer to the top of the hill; the downhill ski or outside ski is the ski that’s closer to the bottom of the hill). Do not take big steps; first get comfortable with small ones. To prevent sliding, place your downhill ski on the inside edge (that’s closer to the top of the hill) Your poles will help with your balance. Now try to do the same in a different direction. Great.
Your First Run
Now you are ready for your first run. It’s very important to smile. You are here to have fun! Look around, the mountains are so beautiful. And around you there are a lot of people who came here for the same reason: to breathe some fresh air, to have unforgettable fun skiing, and to have an all around good time. You’ll have a good time smiling too!
Climb a little bit up the hill. It is understandable that your skis will slide by themselves. Now what should you do? First, try to turn your shoulders down the hill, putting your poles in front of your shoulders and your hands on the top of your poles. Now your shoulders and your hands are facing down the hill, while your skis are sideways. So now try with small steps to point your skis downhill, while putting your weight on your poles. Now you are standing on parallel skis, with your body facing downhill, while putting some weight on your poles. What do you have to do to make your first run? Just pick your poles up off the snow and go! You will stop by yourself because of the friction between your skis and the snow. Try it one more time. As you practice more and more, better you will become better and better. Now let’s make some changes. Climb a little higher, and when you are finishing the run, try to slide your skis into a wedge. I believe you remember how to do that. Keep in mind the position of your hands; they are stretched forward, slightly bent at the elbows. Very good. Now the next exercise. Climb again a little higher and try to make the whole run in the wedge. If you have a problem with the tips of your skis crossing, that means that you have to correct your stance. Try to keep your hands forward and bend your knee a little more. Better? Great. Now what you have to do looks a little bit different. In your next run, try to adjust your wedge: make it bigger and smaller. You will realize very soon that the smaller your wedge, the greater your speed. So, while you’re adjusting your wedge, you’re adjusting your speed. Get a little bit of practice with it. The more you practice, the better you will be . Here are some more tips:
1. Practice narrow then wide wedges while gliding downhill
2. Practice widening and narrowing with one foot only. Alternate feet while gliding
3. From a straight gliding wedge ,or straight run, turn one foot further to bring yourself to a stop. Try using alternate feet
4. Turn tips of both skis in the direction of the turn
Making Turns
Now it’s time for us to make some turns. So you are in the same place as you were before in the wedge position. What do you have to do to make a turn? Just put a little bit more weight on one ski! How is that done? Just bend one knee a little bit more and redistribute more of your weight on it. Bending your right knee, you go to the left, and bending your left knee, you go to the right! That’s all that you have to do. Do not try to put too much pressure on your turning leg. Just a little bit. For some people it works when they are just thinking which side they want to turn or which way they want to go. Now practice, practice and practice! The more you practice, the better you are! Try different turn shapes. For example: you can make turns while counting to five and counting to three. You’ll find out that the bigger the turns, the higher your speed becomes. What do you have to do to slow down before your turn? Just put a little bit more weight on your downhill ski, meaning bend a your knee a little more applying pressure forward. That’s all that you have to do. Now howto practice? First, try to follow my instructions. The most important thing is body position. Try to keep in mind that your stance and balance are the most important parts of skiing. Try to make your movements at low speed. When you get a consistent feeling, you can increase speed and can try a little steeper terrain. If you don’t feel comfortable there, please come back to practice on a flatter slope because the key to your future successes is there. I hope you have a lot of fun and wish you good luck in your new endeavor.