Welcome to the Advanced Lessons page! The fact that you are on this page tells me that you already have several skiing seasons behind yourself and now you are looking for a guidance on what you can do to become an advanced skier. You’ve already skied several resorts in US and maybe even visited some slopes in Europe. You know the difference between really groomed terrain in the early morning hours and slushy, bumpy snow at the end of the day. So you already have some experience and you are here to improve, to become a better skier, to feel comfortable in different snow conditions and turn shapes.
As I told you before, to improve your technique, you have to use various exercises and drills. I completely understand that when you come to a ski resort all you want to do is ski. It’s true that the more you ski the better you are, but if you add to your skiing special drills designed to improve your existing skills, you will become not simply a good skier, but a great one!
Why are ski instructors good skiers? For two reasons. First – they have to ski a lot. Second – when they teach they use specific drills for improving different skiing skills. The same is true for racers: they use drills in their freeskiing and on the gate training. Drills create skills. Hermann Maier is the prime example. Before he became the Olympic and the World Cup champion, he was a ski instructor at his father’s ski school.
Take advantage of the ski instructors’ expertise when you go out on the slopes because a good ski instructor can see any weaknesses that might be in your technique and show what kind of drills you can use to fix them. When I’m giving a lesson, I usually ask my students to make a run of about 100 feet (30 meters). After that I know what I have to work on.
I wrote this chapter for those of you who don’t want to be bothered with instructors and want to do their own thing at their own pace. Below are some exercises that will prove to be very useful to you in improving your skiing skills. It would be great if you have a more experienced friend who could give you a feedback on your progress. If not, try to watch your own shadow on sunny days or concentrate on how your feet feel. If you use these drills for a half an hour every day skiing, you wouldn’t believe how good you can get by the end of the season. Good luck!
- Traverse
- Open Parallel With No Poles
- Vertical Sideslips
- Hockey Stops
- Falling Leaf Sideslip
- Skating
- “1000 Steps”
- Hop Turns
- Wedge Hop
- Leapers
- Uphill Christies
- One Ski Skiing
- Short Radius turns
- Bumps
Traverse
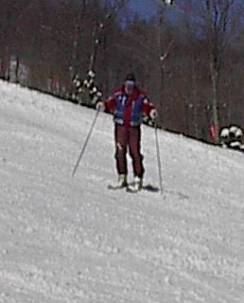
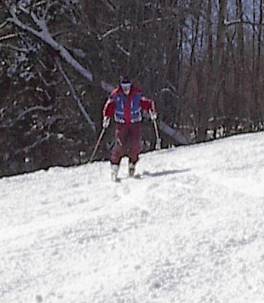
We use traverse when we ski across the terrain or as a part of linked medium turns. Make sure that you are in the right stance: your arms are extended forward, your knees are bent, your shins are against the tongues of your boots, the pressure on the tongues of your boots is distributed approximately 70/30 between downhill/uphill ski. Maintaining the hips over the feet, allow the uphill ski and boot to travel about half a boot ahead of the downhill ski and boot. Do some static edging exercises where your downhill knee goes slightly inside the turn and your hips are turned in the direction you are traveling and slightly down the hill because the edging comes from the hips. You should stay in balance with the majority of your weight on the downhill ski.
Progressions:
- Traverse- edge set.
- Traverse with side slipping.
- Traverse with tipping your skis uphill.
- Traverse with hopping from foot to foot.
- Traverse in a wider stance with steps up and down the hill.
- Traverse on the uphill ski.
Open Parallel With No Poles
This is the upper of the lower levels of skiing (when you are coming out of Christies). The main idea is to execute nice and smooth turns with skis in consistently matched position, putting more weight on the downhill ski. Make sure that you are in the right stance. From this position, flex and extend your knees. This exercise will teach you to feel that you have to extend your knees to make your skis easy to turn and that after the turn you need to flex in your ankles, knees and hips to make your arc nice and smooth. Stay slightly flexed through the turn completion with pressure dominating the downhill ski. Above the fall line your hip movement toward the inside of the turn should be dominant.
Progressions:
Before and after the turn try skiing:
- On downhill ski with lifting uphill ski.
- Keeping either tip or tail on the snow.
- The whole uphill ski in the air (all of this is about balance and pressure).
- Shuffling.
- 1000 steps.
Vertical Sideslips
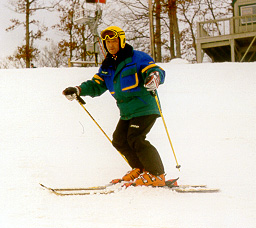
This exercise promotes an efficient balance – countered stance (open countered hips). Hip countering movements are an important component of advanced turns. Make sure that you are in the right stance. In order to separate your upper body from your lower body you must twist the torso firmly towards the fall line. Also turn both shoulders downhill, reaching with the arms over the downhill ski. Maintain a strong upper body with hips positioned fairly high and over the feet. Open the hips towards the fall line and keep the uphill hip, knee, and foot half a boot ahead of the downhill hip, knee and foot
Progressions:
- First tip your legs and feet down the hill to bring your upper body over the feet and then tip your legs and feet in the opposite direction (up the hill).
- Use flexion and extension movements to engage and release the ski edges.
- Pull skier down the hill by his poles.
- Short radius turns behind the leader in the wedge.
Hockey Stops
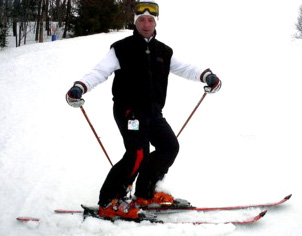
Hockey stop is a stop with matched skis, which creates the upper and lower body separation and a countered stance, legs and feet should turn sharply in the opposite direction of the upper body. Make sure that you are in the right stance. Do a straight run then turn the skis sideways with feet going either to the right or to the left.- quick pivoting movement of the legs and feet, while the rest of the body remains still, facing the fall line. The goal is to be able to stop while maintaining balance and weight over the downhill ski.
Progressions:
- Stop on one ski inside and outside, with or without pole plant.
Falling Leaf Sideslip
“Falling leaf” is an exercise which combines fore and aft balance, tipping (edging) movements and twisting movements. The objective is to slide forward and backwards within the corridor in a crisscross fashion. Stay in the proper stance. Putting more pressure on the downhill ski, keep your hips open towards the fall line. The uphill shoulder, knee, and foot must lead. Without rocking or moving the body, press forward on the tips of the skis while slipping forward. More pressure on the balls of the feet moves skis forward. Gently turning feet and skis uphill will add to the exercise. Skis come to the stop because they are edged and turned slightly uphill. Allow the pressure to move towards the hill while maintaining the same amount of edging. The skis will begin to slip diagonally backwards. Begin to turn the feet gently so that the tips of the skis will drift downhill faster than the tails. As the skis begin to slow down again, press onto the balls of the feet to get skis to move forward so you can repeat the exercise
Progressions:
- Pressure fore and aft, edging and tipping skis.
Skating
Skating down the hill is an exercise that will help to create foot to foot movements with strong hip movements down the hill and motionless upper body. Skating across the hill will help to develop movements during which upper body moves slightly ahead of the feet. Focus on moving forward from the extended downhill leg. Stay in the basic stance. Your hands should be forward, you are in slightly countered position, knees are bent, shins are against the tongue of your boots, you feel the strong contact between the ball and the arch area of your foot in your boot.
Progressions:
- Pretend to skate on the ground without skis (do skating “steps” making sure that you control your arm/foot movements).
- With only left ski on, with only right ski on, with both skis on.
- Skate across the hill.
- Skate turns. On the skate turns extending the uphill leg moves the body across the skis, downhill and towards the new turn as the ski tips enter the fall line.
1000 steps
1000 steps (also shuffling) is a great exercise to develop body position over the outside ski, commitment to the turn and an active movement of the body across the skis. This exercise can be varied to develop and enhance five of the six basic movement patterns of skiing:
- Adjusting balance along the length of the skis.
- Twisting feet and legs.
- Tipping feet and legs to engage and release the edges.
- Moving from foot to foot to transfer weight.
- Flexing and extending legs to control pressure.
By learning 1000 steps, you will begin to develop hip angulation which leads to edging of the skis.
Progressions:
Make sure that you are in the proper stance. On flat terrain make some steps with one foot, with another foot, move pressure forward and aft, show flexion and extension in your ankles, knees and hips, show movements foot to foot. While moving, practice lifting uphill ski, lifting downhill ski, tipping your skis uphill creating edges, do the same in a wider stance creating hip angulation and movement down the hill.
Hop Turns
Hop turns is a great exercise for edge control and twisting or pivoting movements. This is an intense exercise even for the most adept skiers. Hop turns require explosive turning movements of both legs and both feet to change the direction of the skis. Stance and balancing movements are critical. Your ankles do the major part of the job when hopping. You will need to keep in mind the following in order to perform hop turns correctly:
- Skis parallel and across the hill target, hips and upper body down the fall line .
- Maintain rounded shoulders and a carved spine to help keep the upper body aligned over the feet .
- Stay flexed with both ankles and knees pressed forward and tipped up the hill .
- Keep strong contact over the arches, focus the majority of weight on the downhill ski.
- Plant the downhill ski solidly on the snow .
- Hop off the snow by extending the ankles and knees explosively, leaving the pole on the snow.
- Twist the feet and legs while in the air, pivoting the skis around the axis of the boots .
- Flex again and plant the other pole upon landing to prepare to hop and twist the feet and skis the other way.
Progressions:
Begin by doing hop turns on the flat terrain first without skis, then with right ski on, then with left ski on, then with both skis on, then do the same on the steeper terrain.
Wedge hop
Wedge hop is a great exercise to reinforce edge control and foot-to-foot movements
- Maintain a countered relationship between your upper and lower body .
- Put your skis in the wedge facing down the fall line .
- Feel the shins touch firmly against the boot tongues to ensure centered position of the hips and therefore the upper body over the feet
- Lift one foot off the snow as you begin to glide forward .
- Make small lateral hops from edge to edge while moving straight down the fall line .
- Plant the right pole when hoping from right to left and the left pole when hoping from left to right.
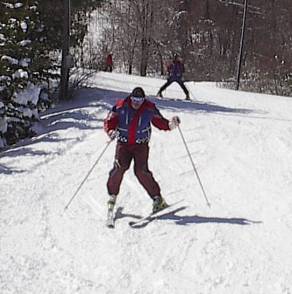
The foot and primarily the ankle should dominate the movements. Extend from the ankle to jump from the previous edge and flex the ankle to engage the new edge. Contact progressively increases forward and against the inside of the boot tongue as the ankle flexes. The upper body stays relatively still as you displace your weight from edge to edge while leaping from foot to foot (from arch to arch). Pole plant is necessary for timing the hop and stabilizing the upper body
Progressions:
On flats without skis, with right ski, with left ski, with both skis, do the same on the steeper terrain.
Leapers
Leapers incorporate all basic movement patterns of skiing and are appropriate for developing the mechanics of medium radius turn. They are an appropriate choice for situations where snow or terrain make it difficult to initiate the turn
- Choose the right terrain. Start traversing across the slope. While traversing, flex to prepare for the hop that initiates the new turn .
- Hop vertically using a pole plant for stability. While in the air, steer the skis slightly downhill and towards the next turn .
- Absorb the impact of the landing by flexing knees and ankles .
- During flexion, tip the skis onto their edges while continuing the guiding movements you began in the air. Continue to increase the edge angle as the turn develops. This creates a solid platform from which to hop to initiate the new turn.
Progressions:
Begin on flat terrain without skis, with the right ski on, with the left ski on, with both skis on, do the same on the steeper terrain
Uphill Christies
Uphill Christies contain all of the basic movements that can help you feel what your skis can do when they are actively edged and pressed. They also will help you understand how to continue to guide skis during the turn. Do not forget to flex your ankles and knees
- Face your body and skis about 45° from the fall line.
- Begin to glide across the hill on that 45° line .
- Press onto the ball of the downhill foot while feeling pressure on the front, inner part of the boot tongue. These movements engage the edge and cause the ski to bite into the hill. Slowly the ski will bend into the arc and turn uphill
One Ski Skiing
One ski skiing is a wonderful exercise for improving balance and all other skiing skills that a good skier should demonstrate like:
- Adjusting balance along the length of the skis .
- Twisting the feet and legs .
- Tipping the feet and legs to engage and release the edges.
- Flexing and extending legs to control pressure.
In this drill try to pay most attention to two different things: first – you have to feel the tongues of the boots on your shins. Second – and that is probably the more important thing – you have to get the feeling that your feet together with your skis roll underneath you from your big toe (fully edged position) to your little toe (fully edged position again). This is exactly the same feeling that you get while carving.
Progressions:
Standing on one leg without ski make some aft and forward movements, flex and extend, roll your feet and legs right and left, do the same with the right ski on, with the left ski on, on the flat straight run try to do a hockey stop on one ski changing from left to right, on a steeper terrain traverse on the downhill ski then on the uphill ski, then try uphill Christies on one ski. Having done these exercises now you can do long and medium turns on one ski.
Short Radius Turns
Short radius turns will add efficiency to your skiing. The most important things that you need to maintain for these turns is your upper-lower body separation, the balancing movements and your body position (open countered hips are a crucial component of advanced turns). Make sure that the first part of your body that begins the turn is your feet. On the downhill ski you are rolling your feet from the big toe to the little toe (from edge to edge), and on your uphill ski your foot rolls from your little toe to your big toe (edge to edge again). All these movements have to be done simultaneously. To help control your movements, try to imagine that you are skiing in a room with a really low ceiling and you have to limit your up and down motions. Concentrate on feeling your lower body roll underneath your stable upper body.
Progressions:
- Do hockey stop without pole touch, hockey stop with pole touch, hockey stop without coming to the full stop but with sliding down and pivoting around your axis.
- Try side slipping on one side, side slipping on another side without pole touch then with pivoting around your vertical axis.
- Do the same with pole touch making side slipping between pivoting shorter and shorter and finishing in a short radius turns. Try to do hop turns as well…
Bumps
Most important parts of bumps skiing is upper-lower body separation and edge set. Before skiing bumps make sure that your stance is slightly countered
Progressions:
- Traverse left-right while flexing and extending. Next do the same through the bumps. Full flexion with deep knees bending occurs on the top of the bump and full extension in the deep.
- Sideslip on both sides through the bumps using the bumps outside of mogul field (those are generally softer, smoother so easier to deal with). Do the falling leaf exercises using different pressure-leverage, aft and forward, side-to-side, up and down pressure, sideslip and turning while projecting center of mass down the fall line. Do the same through the bumps.
Everything has to be done with pole touch. Be soft, subtle and passive, that will make it so much easier to turn through bumps. Solid edge sets directly down the fall line. Do not steer left or right. Start the run through the bumps with a solid edge set on the first bump followed by turns using all the previous exercises. Continue run with absorption, ankle and knee flex, direct arms and body mass forward down the fall line.


